🎮 Upgrade your game with pinpoint precision and zero drift!
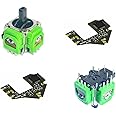
The ElecGearHall Joystick Kit Replacement for DualSense Edge PS5 controllers features advanced Hall Effect thumbsticks with electromagnetic sensors for superior accuracy and durability. It includes dual calibration PCBs for customizable joystick centering and curve adjustment via PC, plus a professional desoldering toolset for precise installation. Ideal for gamers seeking enhanced control and longevity in their PS5 controllers.
| Brand | ElecGear |
| Item model number | HL-DSE |
| Item Weight | 1.76 ounces |
| Package Dimensions | 3.03 x 2.68 x 0.87 inches |
| Color | HL-DSE |
| Manufacturer | ElecGear |
| ASIN | B0CYB7LJVP |
| Country of Origin | China |
| Date First Available | March 18, 2024 |
M**L
Incredible results, requires skilled installation.
Installation instructions are easy to follow, but do require reasonable soldering skills.Purchased the DSE version, and the calibration process is simple as well as painless.I was successful in achieving below 5% circularity, but settled for above 6 to prevent dead-zones in the outer ring. The results are simply incredible, and the process itself was fun. Definitely recommend for someone skilled.
J**N
Terrible product
Fully assembled this product correctly followed all the instructions and my controller never turned on my kit did not come with the blue wire for the foldable pcb the instructions were very terrible you would need to be really good at soldering to diy this I ordered 2 of these joystick the first one was wrong so I had to use the blue wire out of it to install the seccond one I got all in all terrible product wish I could get my money back they got me good for a product that doesent work
R**D
Well thought-out kit. Excellent results.
Review is for the PS4 version of the kit.What you'll need that the kit doesn't provide:Pro:Very complete kit.Well manufactured.Desolder plate is a godsend.Con:Instructions could be better.Included wire is slightly larger in thickness than a human hair - I used my own 30 Ga wire, stripped it and tinned it, then used that to bridge to the pins.Included plastic PCB clips melted during the desolder process - recommend you use a soldering "helping hands" or similar clips.Required:Soldering iron - 60W with a chisel tip and a precision pointed tip. (Recommend variable temperature.).6mm 63/37 low temp solder.Precision Side Cutters.Multimeter for continuity testing. (Recommend audible alert for continuity)Highly recommended:30Ga wire.Helping hands solder station for holding the board during the process.Lighted magnifing glass for precision work.Housekeeping:First off, this process takes some skill and some good equipment. It's not for a novice to attempt - but when done correctly the results are pretty amazing.Second there's a review from Nicholas G. that discusses removing the isolating material from the center pins on the sticks - DO NOT DO THIS. The way this modification works, the input signal is received from the stick and sent to the MCU on the calibration board - that conditioned signal is then sent back to the controller, if you remove the isolating material you will bridge the connection from the stick to the controller - bypassing the calibration board for that axis with a short across the board. It is very importand that the calibration board is soldered only to the controller PCB on those center pins at the base. The top of that pin then gets soldered to the pad on the calibration board. This is the most inricate and difficult part of the soldering and can easily be bridged.Continuity testing is your friend - have a good multimeter with some semi-precise probes.Desolder Process:Recommend a larger chisel tip, temp set to 450-480CAdd some low temp (67/33) to all the existing joints, add solder from one side apply heat to the opposite and use the surface tension of the larger chisel tip to try an "pull" the higher temp solder off the board.Clean tip after each pin to remove higher temp solder.Using a helping hands satation suspend the board in the air with enough room for the analog stick to fall freely.Pre-heat the desolder block off of the board.Once to temperature overlay the desolder block ontp the analog pins - keep heat on as you do this. The solder should melt rather quickly.A light tap on the desolder pad with the iron should cause the stick to fall if not use some metal tweezers and try to pull lightly. If still stuck you may need to try adding more low temp solder to the pins.Once removed use the desolder wick to cleanup any remaining solder - don't press too hard while moving this around you don't want to expose any additional copper. I recommend using some flux here to help with this.If changing tip for soldering process, power off the iron so it can cool.Clean area with isopropyl alcohol or PCB cleaner to remove excess flux / carbon discolorations.Solder Process:Use a more precise pin tip, set temp to 325-350C and 63/37 solder.Solder the larger housing pins first as outlined in the instructions, choose one, then do the one in the opposite corner. Then finish up the last 2.Soldering the calibration pad doesn't have any specific instructions other than starting with the power connection first.Once that's soldered you're kinda left up to your own judgement.I recommend soldering the center axis calibration board to the controller next. This is half of the most difficult part of the job. Doing it now reduces the risk of bridging with other pins if you accidentaly heat their solder.Test continuity controller pad to calibration pad should have continuity - top of the analog stick pin should not.Solder the rest of the remaining pins.Tin the pads for the center axis connections.Tin the tip of the center stick pin. Becareful not to use to much and bridge it to the connection below. A little dab will do.Now would be a good time to clean the PCB area of any flux from the previous soldering processes.To make the center connections from the analog stick to the calibration pad I used my own wire (30 Ga) as i didn't care for the bundled wire. I recommend stripping a good length of wire and tinning it.Solder the wire to the pad on the calibration PCB.Bend the wire over the tip of the analog pin and solder that connection.Trim the excess wire from the tip with some precise/jewelery side cutters.Test continuity exists from the tip to the calibration pad.Test continuity does not exist from the tip to the controller pad below.You have completed all of the install steps, but I recommend keeping the soldering iron hot to disable the calibration pad once the stick has been calibrated.Calibration:Do not fully reassemble game pad. Screw the PCB back to the housing and connect the usb port "close enough" without re-engaging the housing clips.Follow the dedicated instructions to calibrate the stick - there are 2 methods of calibration - basic and precise, you should do basic first.On the PS4 this involves a full-angle tilt on the controller at power on. You'll see on the calibration screen a moving of the inputs in a clockwise pattern.Spin the sticks in a few full circles then hit the center button. Once the input stops the data is saved and you can power off the controller.Proceede to precice calibration if desired.Repeat steps for second stick.Once satisfied with calibration - give it a quick test with a game - make sure it feels alright. Be careful to not accidentally engage calibration mode again.If satisfied I highly recommend if you live in a house with other people you solder the pads together to disable the calibration board at this time. This will store the current calibration values and prevent the board for entering calibration mode again accidentally and wiping out the current calibration. I do it for all my replacements, there really should be no need to ever enter calibration mode again.
M**.
Works great!
Comparing these to the AliExpress calibration boards, I think I like these better. Comes with plenty of tools to help (PCB clamps, desolder plate, wire, wick, etc.) most of which I didn't need, but nice for those that do. The instructions are pretty extensive, I could see them being a bit overwhelming to someone who is new to this kind of work.The install process is very similar to the AliExpress calibration boards, but slightly easier and quicker IMO. The LT compensation is superior as well, once connected there's ZERO stick movement when LT is engaged. Calibration is much faster than the other boards, allowing you to set center point and range in all 4 directions within one power cycle. It's a common misconception that smaller circularity test numbers are always better. NOT TRUE. You want to go PAST the circle in all directions, not simply touching the circle. 7-10% being ideal. All in all, pretty happy with these, just wish I could buy the boards by themselves, because the whole kit is pretty pricey...
D**N
Works great. bad joystick.
I do alot of joystick changes and other work on controllers so i know these controllers well. I installed the kit and it worked great with no issues. A week later one of the joysticks appears to have something internally wrong with it (controller is babied and never dropped). I took it apart and could find nothing visually wrong. The joystick has to move a decent distance left or right before registering movement and it feels different from the good working joystick. (I think something internally maybe let loose). I cannot seem to contact the seller in any way (even through his website or amazon). I'd just like to get a replacement joystick. If I was able to get in touch with the seller I would up the review stars...
J**A
Difficult but works well. Very thought out kit.
This is definitely not for a novice in soldering. I have been soldering for 7 years and this took me three hours because it was tight and very precise. I did manage to get them to work first try and would not recommend the average person to attempt this, I also had all the right tools and techniques for soldering.The kits has literally everything except solder, flux and an iron, like it states. It is EXTREMELY thought out and you will not need anything. Instructions and images could have been placed better and slightly more detailed but seller said he had a video. Great kit.
L**.
Not reliable
Got this to fix a module with stuck drift since the really OEM ones are priced gouged, but after connecting it all together the joystick is going full tilt to the left. They felt good but from I can see the joystick is defective.Tried troubleshooting and calibration didn't work so do with this info what you will. Seems to be using old joysticks with issues.
Trustpilot
1 month ago
1 day ago