We remain fully operational. Our teams are working around the clock to ensure your deliveries continue safely.

DOWNLOAD THE APP


Customer Services
Copyright © 2025 Desertcart Holdings Limited
DOWNLOAD THE APP
🌿 Elevate your plant game—because your green corner deserves the spotlight!
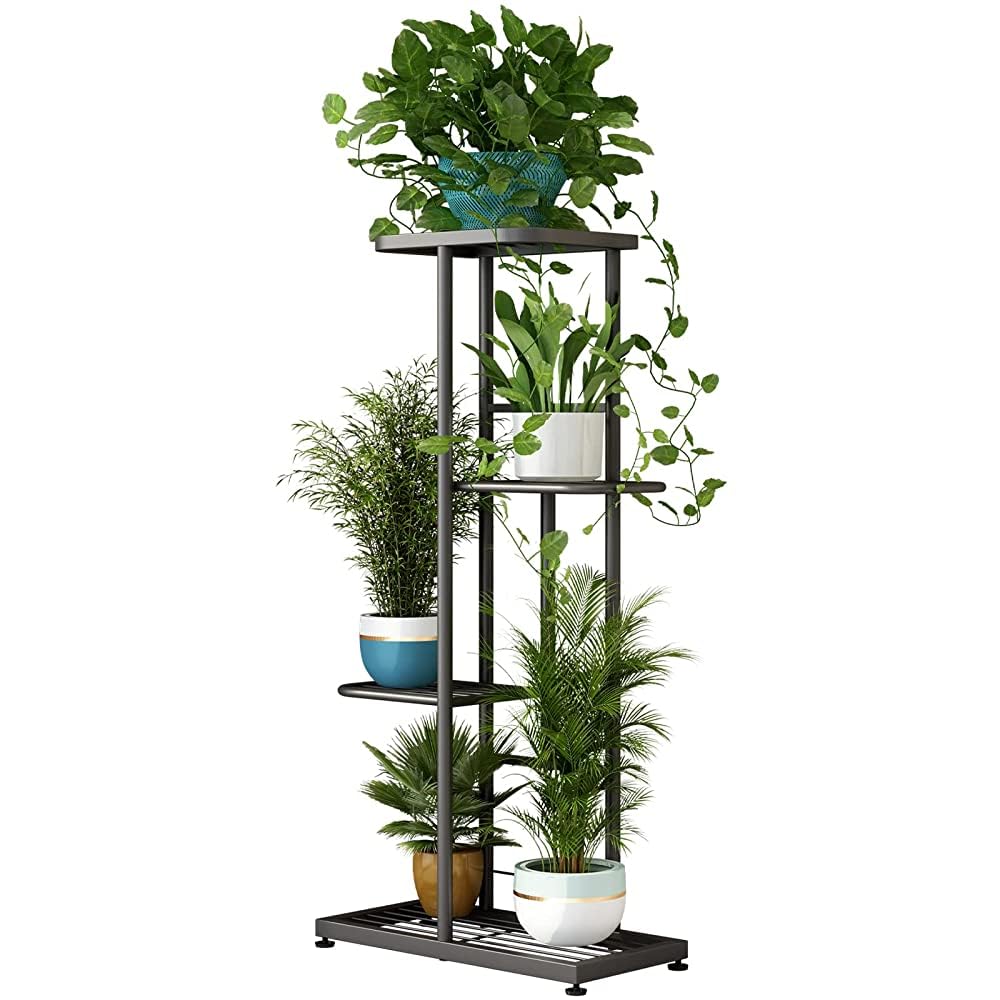
The LINZINAR 4-tier metal plant stand offers a sturdy, rust-resistant solution for stylishly displaying up to five pots in compact indoor or outdoor corners. Measuring 17.1 x 8.7 x 31.5 inches, its smooth, durable iron frame features a widened base and protective foot pads for stability and floor safety. Easy to assemble and multifunctional, it’s perfect for millennials seeking a chic, space-saving way to showcase plants and personal treasures.


| ASIN | B09RF28M7N |
| Assembly Required | Yes |
| Base Type | Leg |
| Best Sellers Rank | #2,190 in Patio, Lawn & Garden ( See Top 100 in Patio, Lawn & Garden ) #17 in Plant Stands |
| Customer Reviews | 4.2 4.2 out of 5 stars (5,785) |
| Finish Type | iron |
| Item Weight | 3.44 pounds |
| Manufacturer | LINZINAR |
| Product Dimensions | 17.1 x 8.7 x 31.5 inches |
| Riser Color | Dark Grey |
| Shape | 4 Tier-5 Potted |
A**A
Large and well made.
Much larger than expected and that's a good thing. Put together in less than 10 mins. Would have been faster but the Allen key provided was a little too long for one screw and only let me get a 1/4 turn at a time. Sturdy and well made.
B**K
Easy to put together
The sturdiness of the stand is questionable, but i have it in a corner and it is out of the way. If you have any animals it would not be the best stand to get. It works well for me.
J**N
Okay for the price.
It looks great. It's a little wobbly, so avoid putting too much weight on it.
N**G
Awesome stand for a small space!
Enjoying my new plant stand so much! It was easy to setup and holds 5 nice size plants or a few extra small size plants. I needed it as my plant family somehow keeps growing! If you are looking for something for a small space but sturdy and adds a pop of color this might just what you need. It definitely works for me!
A**.
I AM ABOUT TO MAKE YOUR LIFE EASIER
Did you buy this? Are you worried by the reviews, or confused by the instructions in the box? Well, I just put this guy together and let me tell you, it was annoying, but I learned some things. LEARN FROM MY MISTAKES; make your life easier! I have included pictures for convenience. 1. Step 1 of the instructions is the part that screws everyone up, including me. See, the picture of the single pole is labelled "F", but the picture is of the longer pole "G", which has a graduated step on the top so it can slide into "F". Yeah, that picture is wrong. The label is correct, though. See, I thought someone put the wrong sticker on the longer pole with the stepped end, and made my product look like the picture in step one. I should have known something was wrong when the side with two poles and the side with one pole were uneven, but I kept going - only for the shelves to tilt horribly in Step 3. Luckily I wondered if flipping the single pole upside down would fix the hole alignment issue, and was correct. So in summary, IN STEP ONE (1), USE THE SHORTER POLE LABELLED F, NOT THE LONGER POLE WITH THE STEP THAT IS PICTURED IN THE INSTRUCTIONS. 2 - Seriously, don't tighten the bolts all the way when you're assembling. I did, and I regret it. I made so many mistakes putting this thing together that it was a hassle and too much effort to unscrew the bolts each time I realized I had screwed up. Also, it helps when wedging the shelves in between the two sides to have a little jiggle in the poles. I did not. It was annoying. 3 - When adding the last shelf BEFORE the top shelf, the two sides of the stand are going to want to pull apart and not hold that last shelf. So you're going to have to hold one side against your knee or thigh (or a chair, or whatever, something solid), and keep a bit of pressure on the opposite side so the structure doesn't spread and drop the last shelf while you're trying to place the top shelf. Yeah, it's a pain. 4 - KEEP THAT PRESSURE GOING WHILE ADDING BOLTS TO THE TOP SHELF. Once you have a bolt screwed in just a little bit, move to the next one until you're done with all three. Then you don't have to worry about keeping the pressure on both sides of the structure, and can focus and use both hands to screw in the last three bolts all the way. Yes, you can tighten them all the way, now. Go bonkers. 5 - The little plastic feet on the bottom are a great way to adjust for your floor not being level (or, more likely, your stand not being level). HOWEVER THEY ARE SUPER LOOSE. When I encounter this sort of leveling function on something like this, I like to use a bit of Plumber's Tape. You can get a roll of it pretty cheap at the grocery, big box store, and here on Amazon. Just wrap the bolt on the foot with a bit of the tape, THEN screw it in. Once you find level and are done adjusting the feet, the tape will help the feet STAY PUT if you ever bump the unit when watering, changing plants, or moving it. 6 - If you're a constant butterfingers like I am (I swear I dropped the little included allen wrench SO many times), you're going to accidentally bump those shelves and they're gonna pop upwards off the little sort of hook that keeps them from folding downwards. Now, I am cheap and I use bread bag twist-ties and kitchen string, but you can use string, yarn, wire, whatever, and just bind/lash/tie the two poles together at that spot like I have in the picture, and it won't pop up when you knock into it. I like to dab wood glue on the knots to keep them from unraveling, but white school glue or hot glue works as well. Or... you know. White electrical tape instead of any of those options, if you want it to look less chep. It's a $30 wire shelf. Honestly, just covering the whole finished structure with a layer of white electrical tape might generally improve it all over. Or that cute patterned duct tape! Go nuts; it's YOUR shelf! Note: Yes I know I installed the shelves upside-down. I like it that way as it makes a little lip around the whole shelf, and that's useful if I end up cutting plastic sheet to put on them. Second Note: Yes I know in the first pictures I also installed the bottom shelf upside down. I did notice, and you will also notice half way through the pictures that I did fix this, as well as flipping the single pole that I installed incorrectly. I HOPE THIS HELPS SOMEBODY! GOOD LUCK! ENJOY YOUR PLANTS! (And maybe the plant stand, too. MAYBE.)
B**Y
Truly a nice looking stand!
This is a very nice plant stand, It holds five plants very stable. The unit was very easy to assemble, very stable and comes with the tool for the bolts. I want another, but I don’t have any place for it!
C**J
Boho shabby chic look
Perfect plant stand! I have it on my lanai and will put small plants in the planters and maybe one bigger plant at the base. Fairly easy to put together. I recommend it for small plants. Adding plants will be next.
J**R
Plant stand
This unit was very easy to put together. It is very flimsy and it cannot stand a lot of weight so it’s very small flower pot. Nothing large other than that it works great.
G**E
Facile à monter, beau résultat. Correspond bien aux images montrées. Les plantes moyennes ont assez d'espace entre chaque étage pour se développer. Mais pas fait pour des plantes hautes ou très large. Bien regarder les dimensions.
P**R
Good quality and valued for money
S**S
Maravilhoso!!! Melhor compra que ja fiz nos últimos tempos!!!
A**O
Muy bonita y fácil de instalar, es ligera pero con una planta pesada en la base o 2 se equilibra perfectamente
R**E
Cumpriu o q prometeu.
Trustpilot
2 weeks ago
1 week ago