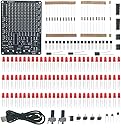
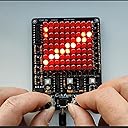
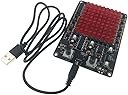
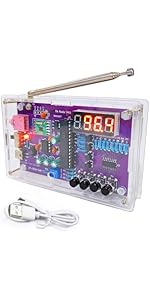


Buy anything from 5,000+ international stores. One checkout price. No surprise fees. Join 2M+ shoppers on Desertcart.
Desertcart purchases this item on your behalf and handles shipping, customs, and support to Ireland.
โก Light up your skills and your space with every soldered connection!
The Gikfun EK1974 LED Chaser Kit features 81 LEDs on a high-quality PCB designed for beginners to practice soldering while creating adjustable, dynamic light patterns. Powered by USB or battery, it includes clear instructions and is perfect for STEM education and DIY enthusiasts seeking a fun, hands-on electronics project.


| ASIN | B0BFHGK7JQ |
| Best Sellers Rank | 8,704 in Business, Industry & Science ( See Top 100 in Business, Industry & Science ) 1,431 in Professional Education Supplies |
| Brand Name | Gikfun |
| Country Of Origin | China |
| Customer Reviews | 4.6 out of 5 stars 214 Reviews |
| Included Components | VHS |
| Manufacturer | Gikfun |
| Material Type | copper |
P**R
Recommended
Good fun. Took me about 4 hours to complete. All components present with a few spares. Well made and easy instructions.
P**N
Great starter kit to learn electronics and soildering.
First time soildering. This kit takes time to build but easy if you take your time. Works great.
A**R
A bit on the easy side, but fun!
I was a bit nervous at first since Iโd previously bought an FM radio practice board from the same brand (GikFun) that arrived with damaged and mismatched parts. Thankfully, this experience was completely different. The kit was easy to assemble and took me less than two hours from start to finish. The instructions were clear, easy to read, and easy to follow. I noticed I even ended up with some spare LEDs and a spare Triode. While I understand itโs meant to be a practice board, soldering so many LEDs did get a bit repetitive. After about twenty of them, youโve pretty much got the hang of it. I wouldโve liked to see a few surface mount components included, as most modern PCBs use those rather than through-hole parts, and thatโs what weโre more likely to encounter during real-world repairs. That said, I knew exactly what I was buying. My main goal was to practice soldering with lead-free solder, which is a bit trickier than leaded solder. It did the job perfectly, and now Iโve got a fun little gadget to tinker with. Totally worth the money, both for those who want to practice and learn, and for those who like to burn time with something a bit more complex than Lego.
C**S
Awesome little kit!
This is a great little kit to not only practice your soldering skills but to also have a ton of fun playing with it, took me around 20 minutes to assemble, really simple instructions and the pcb is very clearly marked for each component, the diy aspect really gives you the sense of accomplishment when you've finished building, gives it that nice touch knowing you put it together yourself! This is a relatively easy build for someone with basic soldering skills, worth every penny!
F**K
Quality seems great, really enjoyed
I felt like a complete beginner before starting this kit, probably having done less than 10 solder connections in my life years ago. I have a very cheap soldering iron from amazon and no experience, but I was still able to put this together over the course of a few hours spread over a week. The result was very satisfying and worked immediately, with only one LED not functioning. I have checked and it looks like the LED does work, so the fault is probably with my soldering or I have damaged the pad. Also, the kit contained 4 spare LEDs and a spare transistor, so I should be able to fix this assuming the pad isn't ruined. Overall this was definitely worth it and I have a lot more confidence and a fun side project completion to go with it.
P**C
Exceptionally good quality and clear instructions
Very easy project. Not easy in terms of soldering, that was actually quite hard work, but conceptually this project is easy. One can see from the schematic what the buttons do, and I was able to explain what the device does to a five year old. Very high quality of kit. Great print quality of the instructions document. The board was really well made too ( no falling off pads ruining the project). Some spare LEDs and a spare triode were in my kit, which I didnโt need but highly appreciate. Solid five stars to this product/manufacturer/seller. Very happy with my purchase
M**N
Great learning tool
Bought for my husband as one of his Xmas gifts (I did ask for ideas!). This is what he said: Itโs a really well thought out learning tool to get to grips with soldering. They give you the order to do things in, so you start with wide gaps and plenty of working space, and things get progressively tighter and more awkward as you get more confident. The instructions are easy to follow and it was a great feeling to turn it on at the end and realise it actually works! Great value for money.
A**N
Great product, worked first time.
Great kit, instructions were easy to follow. I can see how my soldering got better as i progressed. The instructions do say to check each component before using and iโm glad i did as one of the leds had the negative on the longer leg. The do provide extras so it wasnโt a big deal but itโs a lot easier to identify before soldering.
R**K
Fun build and great soldering practice
Picked one of these up as a soldering practice project and enjoyed it enough that I ended up getting a second one. Both builds went smoothly and worked right away once finished. Itโs a nice mix of components and a good project if youโre trying to get more comfortable with soldering. The LED chaser effect looks really cool once everything is assembled. Fun little electronics kit and surprisingly satisfying when you power it up and see all the LEDs start running.
N**R
Great learning tool for those interested in practicing or growing their soldering skills
To preface my review: i've never spent a minute soldering anything before, so I was going into this completely blind outside of watching some tutorials on youtube. The instructions are well written and document every single individual component required to complete the project, and there was never a moment I felt confused or lost due to poorly made instructions. The pictures are pretty blurry, but they ensure to circle every solder point on the board and indicate what numbered component goes where so you don't end up putting a capacitor where it shouldn't go. It took approximately 6-7 hours across two days to complete with the right hardware in hand (heat proof soldering mat, soldering iron, flux core solder, fume sucker, solder sucker, and some copper to remove any accidental soldering plus a multimeter will be handy for testing components prior to soldering). Very fun and simple to do if you have an idea of what you're doing or have worked with small consumer electronics before, but I could see how someone with zero experience working with electronics would easily get lost. I managed to get it working on my first try, but had to replace an LED Diode as it was dead out of the box. I'd recommend this to anyone who wants to learn how to solder and has been working with repairing electronics or computers in the past, but maybe not someone entirely new. Beginners should start with practicing on wires!
M**S
Nice kit, fun item
This is a nice kit to spend an afternoon building with a fun result. The board seems to be surprisingly good quality with nice clear markings for component placement. All components are good quality. All this makes for a good project for beginner to intermediate soldering skills. You will need a multimeter to measure the resistors, but if you do t have one, the colour bands are nice and clear. General tips for beginners: - solder iron temp max 700 degrees - don't apply too much time/heat soldering the LEDs, as they are sensitive to heat damage - take note of the LED polarity: SHORT LEAD = negative = the line on the board marking = flat side of board marking = flat side of LED bulb bottom rim - use IC Sockets (not included) if you have them - mount components in order from lowest to tallest height (resistors 1st, then LEDs, small switches, capacitors, transistors, pots & jack, ICs last) - take your time, take a break & enjoy!
D**D
All parts are thru hole.
There are no surface mount components. Therefore it's very easy to build. When you are finished, it's really cool. Test the diodes beforehand. I like to cut the transistor leads at an angle before inserting. It's easier to insert the long lead first and the rest go in easier. Pay attention to the polarity of the diodes and electrolytic capacitors. Start with soldering the diodes in the middle rows and work your way outward. That way you don't get boxed in as you go. Inspect your soldering and reflow when needed.
A**R
Great kit
Extensive soldering kit well laid out. My unit didn't fully function but it could have been my error in soldering.
Trustpilot
3 weeks ago
2 weeks ago