🚀 Elevate Your Storage Game!
The HyLoft 00540 Overhead Storage System and 80842-10 Adjustable Garage Ceiling Mount Rack Kit offer a robust solution for maximizing your garage space. With a weight capacity of 250 lbs and over 30 cubic feet of storage, this all-steel construction is designed to withstand the test of time while keeping your belongings organized and accessible.
K**R
Does the intended job
I bought this to store cushions from our patio furniture and it does this well. I'm not sure if I would trust it holding 150 pounds.
A**F
HyLoft 45x45 Overhead storage
I'll start out by saying that this product is meeting my needs perfectly. I moved into a new house recently that essentially had a blank slate as far as shelving, storage, etc. In my previous home, I had built garage shelves. (I didn't want to go through that undertaking again.) My new garage has a 12 foot ceiling, so I immediately started looking for a storage system that would take advantage of that otherwise wasted ceiling space.I ordered 4 shelves initially. They arrived within 2 days and were shipped for free (Amazon Prime). There were two fairly minor cons about these units, and they both dealt with the packaging. The outer packaging was solid. There is even a notice on the box stating that there is a template to help with the hanging measurements. My first con, and it could be something that I overlooked, was that there was no template any place on the box. (inside or out) No problem, because I used a thin fiberglass rod and marked the measurements, thus making my own template. (Worked great, definitely recommended.) The second con was that some of the hardware was rolling around free in the box. These nuts and bolts were originally attached to various places on the unit, supposedly making the installation quicker. (Box states that the shelves are "75% assembled") This is a good idea in theory, but in practice many of the bolts worked free. This caused a minor inconvenience for the first few boxes, because the nuts and bolts ended up rolling out onto the garage floor. This resulted in having to hunt down a few bolts. The units come with spare nuts and bolts, with the exception of the MAIN bolt that is need to attach the ceiling downrod braces to the cross braces. Other than these two minor cons, the units arrived in decent shape.As for the installation, things went pretty well. A few recommendations right off: Get a good stud finder! Make a measuring template/guide with a wooden dowel or something light (And rigid). Make sure to pre-drill the holes into the joists. A good ladder. (durable folding or multi-fold works best - i.e. Little Giant)- Also, Visit the HyLoft web site.Prior to the installation, I went to the HyLoft web site to get some installation tips. I came across a PDF template that showed you how to measure and align the units if you are hanging up to four in a row. This came in handy, because this is exactly what I planned to do. There are separate plans for 16" and 24" on center joists. Other than that, I pretty much followed the provided instructions for the first unit. One area where I went against the vendor recommendations: When attaching the downrod bracket to the ceiling joists, I used my impact ratchet to drive in the lag bolts. (After pre-drilling) The vendor specifically recommends not doing this, but... If you are experienced and have access to impact air tools, it will make your job much easier. It would probably have taken at least 2-3 times longer to drive in the lag blots using a normal ratchet. (Plus your forearms would likely get very tired!) The great thing about the installation process is that you don't have to be absolutely perfect. While I recommend being as precise as possible, there is a little "give" if you are off slightly on your measurements. Just make sure that you are as close to center on your joists!! One last thought about installation: My garage ceiling is finished, so the stud finder was essential. Below I will include a link to the stud finder that I purchased from Amazon previously. This particular studfinder (By Franklin Sensors) is the best one that I have ever used. It costs a bit more than previous stud finders that I have owned, but this one is much more user friendly. (No comparison, actually.) If you plan to install many of these shelves, as I did. It will be worth the investment.Anyway, the installation took me a total of about 3 hours for 4 shelves, even with the impact ratchet. If you are installing these shelves, it helps to have assistance. Much of my time was spent climbing up and down the ladder to retrieve dropped nuts and bolts or to grab tools. Having someone to assist would help reduce some of that time.Note: There is some sway to these units when fully installed. I installed 4 of them in a row and attached them together using heavy-duty "zip" strips. Once the shelves had some weight on them, the sway wasn't as bad. If the shelves were more rigid, I am certain that it would take away from the "give" in the installation process.Overall, I liked the first 4 shelves that I installed so much, that I ended up ordering another 4. I installed a total of 8 shelves and figured out the tips that mentioned previously in this review. Below are links to information that helped me tremendously during my installation.The Franklin Sensors stud finder link: http://www.amazon.com/Franklin-Sensors-ProSensor-710-Precision/dp/B0064EICKG/ref=sr_1_3?s=hi&ie=UTF8&qid=1350137064&sr=1-3&keywords=stud+finder or Franklin Sensors ProSensor 710 Precision Stud Finder HyLoft's Web site: [...] - make sure to look up the instructions on installing multiple shelves together. It is listed in the "FAQ" section. Look for the topic ": How many HyLoft units can I install in my garage?" Read more
A**R
Good quality for the price
Additional storage in the garageSturdy of good value
B**Y
Serves the purpose
Each leg is connected to the joist with just one screw, still the rack is sturdy and serves the purpose. I brought two of them and connected both of them with zip ties. It wont sway much if all the screws are tightened properly.
J**N
Easy to install
I was gonna build my own solution. But, after pricing the I would need. These were about the same price and were easier overall. I will be buying an other set soon.
T**O
I'm in love - highly recommend these to anyone running out of space in their garage!
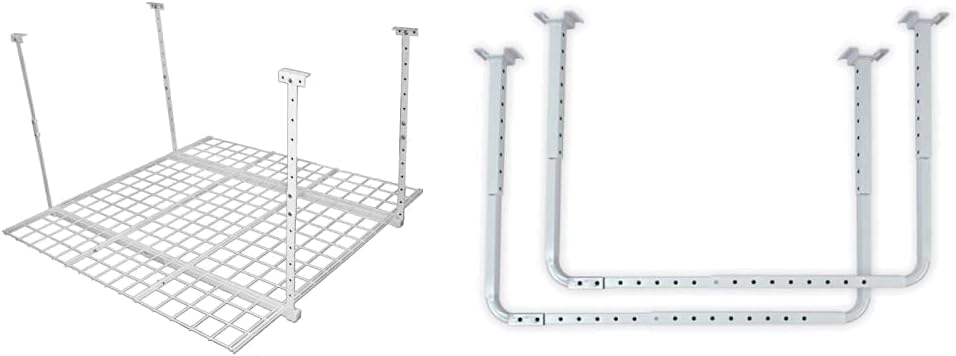
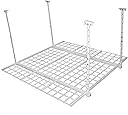
I should preface this review with admitting to the fact that I get a bit more excited about organizational items than is reasonable. you may think of "a place for everything and everything in it's place" is something your mother said, but for me, it's more like a mantra for life.PROBLEM: when we bought a new house with a large-ish 2 car garage, i was happy. when i figured out that we couldn't have both cars in there, parked so that doors on both sides could be opened 3/4 or even 1/2-way, i got sad. then i started searching for shelving solutions and stumbled onto this product, among several others. this discovery led me to climb on a ladder and calculate that we had 200+ (!) cubic feet between the raised garage door and the ceiling. that's a lot of storage for all sorts of things that could be moved off the floor and away from the walls, freeing up more space on both sides.SOLUTION: these shelves! after doing a bunch of research, i decided this product was a good balance of price to functionality, and i'm so happy i did! bought 2 of these, installed them, loved it, bought 2 more. now, using all of the 110 cubic feet of previously completely dead storage space above the garage door (couldn't use up all 200 sq ft, read on for details).INSTALLATION: agree with other reviewers, installing these with a couple of people will go slightly faster and be more fun, but this is perfectly fine for a one man Saturday afternoon project. no revealing insights to add to what's already been said about the installation, but i'll just outline my experience and time investment.- figuring out where to place the shelves was the most difficult part. the garage is sheet rock-ed and painted, so i walked and climbed around with a stud finder, later switching to a drill with the smallest drillbit i had, and just drilled straight into the ceiling a bunch of times in order to find the center of each stud. no one, not even me, will care about a bunch of tiny holes up there. NOTE: in our garage, the studs run width-wise, side-to-side, as opposed to front-to-back, and are spaced 24" apart. the fact that the shelves are 45" wasn't a problem - in theory, you'd want 48", but these shelves are very forgiving. time - 2-2.5 hrs- WARNING: you have to account for a little spike/rise in the movement of the garage door on its rails. when panels are coming out of the turn, they are rise higher than they will be when the door is fully raised/opened. this - and the spacing of the studs - prevented me from placing the shelve closer to the front of the garage. in theory, i could've fit 8 of them, giving me that 200+ cubic feet of storage! oh, well.- drilling the holes, mounting the brackets and putting the shelves together takes, on average, 1hr per shelf, since they come partially preassembled. first one will take 1.5hrs, second one 1hr, third one, .75hrs, etc. if you have all the right tools handy (drill with the right bit, measuring tape, and 3 socket wrenches), you'll fly.RESULT: a ton of reclaimed space, empty walls, 2 cars in the garage - we're opening doors and walking around them like it's nobody's business. the garage looks empty from the street and the driveway. when i realized i could only lower the shelves 21" - missing out on something like 8-10 additional inches - i was sad, but what can you do. if i ever buy more of these for the sides of the garage, i will extend them fully and bask in the glory of all that storage space. highly recommend this product, it's completely worth the investment.
A**S
Great product
Gives us plenty of room
Trustpilot
1 week ago
1 month ago