🔧 Master Your A/C Game with Ease!
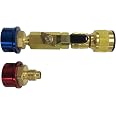
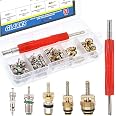
The Mastercool 81490 R134A Valve Core Remover Installer is a professional-grade tool designed for servicing R134a systems. With a compact design and durable stainless steel construction, it allows for easy access to valve cores without refrigerant loss, making it an essential tool for any HVAC technician.


| Product Dimensions | 6.8"L x 4.9"W x 1.9"H |
| Brand | Mastercool |
| Power Connector Type | 3-Pin |
| Voltage | 12 Volts |
| Wattage | 1200 watts |
| Cooling Method | Air |
| Compatible Devices | Desktop |
| Material | Stainless Steel |
| UPC | 700376814903 |
| Global Trade Identification Number | 00700376814903 |
| Manufacturer | Mastercool |
| Number of Items | 1 |
| Model | R134a Installer |
| Item Weight | 8.8 ounces |
| Country of Origin | USA |
| Item model number | R134a Installer |
| Is Discontinued By Manufacturer | No |
| Manufacturer Part Number | 81490 |
A**L
Worked good.
Worked well changing the low pressure valve on a mazda 3 2012, I use the murray kit 26784, the high side valve doesnt fit, the slot is not big enough..The 2 valves are the low side, one ok the other one was bad.The valve withthe tool is the high side, not necessary to replace it but I showed the picture just to let the people know.The tool worked nice!
6**N
These work great with almost no loss of Freon!
This AMAZING tool makes swapping out a leaking automotive A/C Valve core a breeze, with little to no freon loss. It’s super easy to use and feels really well-made—definitely built to last. I was impressed by how quickly and smoothly it got the job done. If you need to swap out a valve core this really beats having to evacuate the system, swap out the valve cores, vacuum the system and refill the system with freon. Highly recommend it for anyone in the trade or just tackling some DIY projects.
M**K
Ingenious and worthwhile tool, provided it works on both high and low side AC ports on your vehicle.
This is an ingenious little tool, IF you can get it to work on BOTH high and low side AC ports on your particular car. Then it's WELL worth the cost. Mine's a 2001 Chevrolet Suburban 1500 LT, and my problem was that GM's OE high-side valve for this (and many other GM vehicles) does not have a "Schrader" type valve core, but rather, a rubber ball/stopper type core. Evacuation of all refrigerant, and replacement of the entire high-side valve, is required to repair a leaky/damaged one.But here's the good news. Dorman makes a replacement that DOES use a "Schrader" type core (Dorman 800-955) instead of the "rubber ball" core used in GM's OE for this vehicle, and I've now confirmed that this tool WILL fit/work on BOTH ports once you've replaced the OE valve with the Dorman one.Thus, even if use of a Schrader type core on the high side valve results in more frequent failures of the core (as some users/reviewers have suggested), you'll now have this handy-dandy tool for easy replacement of either/both cores, without removal of your refrigerant, any time you detect a leak at either of the ports.I also confirmed that the removal tool at the end of the plunger on this device DOES fit on and turn both valve cores (they're both the same size, notwithstanding the larger diameter of the high-side valve fitting), and both cores will travel all the way through the central tube of this gizmo, if you're using it as directed. One note here ... avoid overtightening the quick-connect coupler to the central part of the tool. It will properly seal/prevent escape of your refrigerant with firm finger-tightening only, and if you use a wrench or otherwise overtighten it, the rubber washer/seal it mates with inside the central part of the tool may bulge inward, and narrow the passage your extracted valve core has to travel through on its way toward the removal/replacement end of the tool.Last two points ... the same thing that makes this tool great (i.e., that you can use it to replace a leaky valve core without having to evacuate all the refrigerant from your AC system) is also what limits its functionality. E.g., the thing that holds the valve core in place at the end of the plunger as you pull it out through the tool's central tube is the pressurized refrigerant pushing it upward from below. If there's no pressure in the system, you might as well use an ordinary (and much cheaper) tool to remove/replace your core(s).Also, a little practice and finesse will be required to properly seat the plunger tip on your valve core, because you're doing this part "blind," without being able to see the end of the tool actually going into the valve. I tried it out a few times on my replacement valve before installing it, just to get used to the "feel" of the tool finding its way down the valve opening and seating itself on the core. All that's required is a gentle touch here, and a little practice/patience, and you'll end up having no problem knowing when the removal tool is properly seated on your valve core.
B**H
to me it's easy to tell which one it is
I have a 2000 Class A motor home with a Ford F53 chassis and Triton V10 engine. The tool arrived today and I used it with success. But also with a little difficulty. My low side valve only was the problem. It took 3 attempts before it worked. Reading reviews ahead of time helped tremendously. First make sure what type valve you have. To my knowledge there are 3 possibilities. Schrader, JRA, or what I call a high flow valve, which looks totally different. I went to the auto parts and looked at all 3. If you have access to looking in the valve port after removing the cap, to me it's easy to tell which one it is. I've been told most by far are Schrader. Mine was the common Schrader. I had read in reviews of the valve falling off the end of the tool stem before it was retracted enough to close the shut off on the tool. Yep, happened to me twice. It was easy for me to catch back on to the Schrader and re-install it so as not to lose any refrigerant. One of the reviews mentioned the O ring in the top release cap of the tool squishing in and catching the Schrader if you had it screwed on too tight. Yes this was the case. Barely snug at all, almost loose is all you need. It still does not leak and allows room to pull the Schrader through. Do a dry run before you put it on the car and you will be able to see if the Schrader will pull through or be forced off before it retracts far enough. Another good point on one of the reviews was take a normal valve tool and just crack the Schrader loose before using the special tool. But just barely crack it loose! I did not do this and still had no problem. Backing the Schrader out took more turns than I figured it would. But if you keep a downward pressure on the tool you will be able to feel the click when it runs past the last thread. If you don't have it all the way unscrewed you will pull the tool off of it and have to catch back on to it. Again though this for me seemed to be no problem. I am fussy about my 5 star reviews. The only reason I did not give this tool 5 stars is because, it's not bad, but a little tricky to use. Had I not read reviews I could have had one heck of a time. For what it is designed for, it does the job and saves you a bunch of money not having to evacuate and recharge the system. I do recommend this tool and would not hesitate to purchase it again.
Trustpilot
1 day ago
2 months ago