Buy anything from 5,000+ international stores. One checkout price. No surprise fees. Join 2M+ shoppers on Desertcart.
Desertcart purchases this item on your behalf and handles shipping, customs, and support to Ireland.
💎 Drill Like a Pro, Shine Like a Boss!
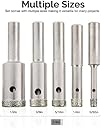
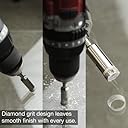
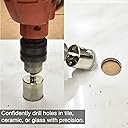
The NEIKO 00823A Diamond Hole Saw Set features five precision electroplated diamond grit bits (5/32” to 1/2”) crafted from heat-treated alloy steel with a unique water-cooling slit. Designed for flawless drilling in glass, ceramics, tile, granite, and marble, this durable set delivers clean, chip-free holes with CNC-machined tips and fits all standard 1/4-inch shank drills. Ideal for professionals and DIYers seeking reliable, long-lasting performance on hard, abrasive materials.


| ASIN | B00ODSS5NO |
| Best Sellers Rank | #401,377 in Tools & Home Improvement ( See Top 100 in Tools & Home Improvement ) #224 in Hole Saw Sets & Kits |
| Brand | NEIKO |
| Brand Name | NEIKO |
| Color | Silver |
| Compatible Devices | Power Drills |
| Compatible Material | Metal |
| Customer Reviews | 4.4 out of 5 stars 4,202 Reviews |
| Global Trade Identification Number | 00837013008231 |
| Included Components | Hole Saw Drill Bit Set |
| Item Dimensions L x W | 4"L x 3"W |
| Item Type Name | Diamond Grit Hole Saw Drill Bit Set, 5 Piece | 5/32” – ½” |
| Item Weight | 1.6 ounces |
| Manufacturer | Ridgerock Tools Inc. |
| Material | Marble,Glass,Porcelain,Ceramics,Diamond |
| Material Type | Marble,Glass,Porcelain,Ceramics,Diamond |
| Model | 00823A |
| Part Number | 00823A |
| Product Dimensions | 4"L x 3"W |
| Set Name | 5 Pc Diamond Drill Bit Set |
| Style | 5-pc small set |
| Style Name | 5-pc small set |
| UPC | 796299245474 837013008231 733353740858 732454533598 756655842501 |
| Unit Count | 1.0 Count |
Y**Y
Cuts ceramic with ease!!!
== Introduction My seedlings have started to produce flowers and I wanted to transfer some of them onto ceramic cups and bowls for display purposes. After purchasing a few beautiful cups and bowls, I found that drilling holes into ceramic material wasn’t easy. It took a couple of hours to drill five holes at the bottom of three cups using masonry bits. There had to be a better and quicker way. After some online research, I found that I needed diamond drill bits. A search on Amazon for inexpensive diamond bits led me to Neiko Tools’ Diamond Grit Hole Saw Drill Bit Set. == Packaging As seen on the included photos, packaging of the set is very simple. The bits are housed inside a styrofoam cutout. No fancy plastic case, just the bits, the styrofoam, and the external packaging that contains the name and picture of the product. I was fine with the simple packaging because it is a factor in reducing overall cost. == Performance Prior to receipt of Neiko Tool’s diamond grit hole saw bits, I purchased an all-purpose bit from a local home improvement store that was advertised to drill holes into concrete, metal, plastic and wood. I also purchased a diamond bit set from a local budget tool store so that I could finish drilling holes on the ceramic cups and bowls I had already purchased. The all-purpose bit barely made a scratch on ceramic material. The diamond bits worked better but were fully spent after drilling three or less holes. The diamond grit hole saw bits from Neiko Tools arrived a day early. With around 20 ceramic pots, cups and bowls purchased from a flea market, I was ready to use the diamond grit bits. Armed with a driver on one hand and a bottle spray on another, I started to drill at a 45-degree angle and as the diamond bit “bit” into the ceramic surface, I slowly changed the angle to be perpendicular to the surface I was drilling into. Three sprays and a few seconds later, the hole was made. I was really impressed at how simple it was to make a hole through ceramic material. The reviews were mixed so I had my initial doubts but I was delighted with the results. Listed below are tips that I found to be helpful in my project. • Wear protective eye gear and dust mask. This is a must for your safety. • Just like any drill bits, the diamond grit hole saw from Neiko Tools will become dull with time. Time is determined by the material you’re drilling and whether you use lubrication or not. • Be patient and take your time especially if you’re new to this. Your patience will pay off with the results. • Lubricate when drilling. This will increase the life of your bit by reducing heat, dust particles and results in cleaner cuts. • Start drilling at a 45-degree angle and slowly adjust to 90 degrees as the bit starts to cut into the material. • Apply very little pressure and let the saw do the cutting. • Keep in mind that with every hole you drill, the bit becomes more dull. As the bit becomes more dull, I had to increase the pressure by just a little. • As a bit became more dull, I had to use both hands on the drill to start the bit to cut into ceramic material. Once the bit started cutting, only one hand was needed. The other hand was back with the spray bottle. • To further stretch the life of my bits, I used the smaller diamond bits from the local budget hardware store to make a smaller hole and then finalize/increase the size of the hole with Neiko Tool’s diamond bits. As of this writing, I’ve only used one bit and it’s not fully spent yet. == Pros • Inexpensive • Works as advertised == Cons • Bits wear out eventually (expected) Conclusion What used to be a gargantuan task of drilling holes through ceramic became a smooth and more rewarding process with Neiko Tool’s diamond grit bits. For what it does and especially the price, consider this tool as disposable once the bits become dull. Lubricate to extend the life of your bits and purchase a new set when the current ones become unusable. Alternatively, you may opt with more expensive sets for longer lifespan. Based on my results, I highly recommend this set to anyone needing to drill holes through ceramic material.
S**A
Perfect Pieces to Make Glass Bottles
So I wanted to post this as soon as I did it so I would not forget to do it later. Let me give you a quick background of me: I don't use tools. period. BUT as a bored college student only going to school two days out of the week and has too much homework to actually get a job I wanted to have a hobby so I have been looking at Pinterest for inspiration. I got this in order to make a glass bottle lamp. I had watched plenty of YouTube videos and read plenty of How-To blogs with these drill bits as well as reading a lot of reviews on here so I had pretty good handle on how to use this drill bits. A little nervous to start right away on the bottle I actually wanted to make into a lamp with, I used a small brown glass bottle as a practice bottle. I put painter's tap on the place I wanted the hole to be and placed the drill bit at an angle. It took a few times to get the bit to catch against the glass but once it did the cutting didn't take long! I straightened out the bit and did circular motions with the drill as it drilled into the glass to help it along. I applied very little pressure. Every ten seconds (I actually counted to ten in my head) I would stop and pour a little water on the hole (I suggest doing this outside like I did) and then went back to drilling. After a full minute there was a beautiful hole right where I had planned it to be! Confident that I could do this, I did the same thing to my Jack Daniels bottle and sure enough (with the biggest drill bit this time - I used the smallest drill bit on the brown bottle in case it got ruined) there was a perfect little hole! After all the reading I have done I knew that you HAD to use water to not ruin these bits or ruin the glass so DEFINITELY MAKE SURE YOU USE WATER while making a holes. Overall these bits came in record time, worked great, and will definitely be using them again!
J**S
Works well but not a long term tool
These bits worked quite well in my hands. I was able to drill six holes through porcelain tile and cement backer board in order to mount a grab bar in our shower. However, the bit is largely worn away, and I doubt that you could get many more holes out of it at this price though it was a great choice. If you haven’t drilled ceramic tile before, I would strongly encourage you to practice on a scrap piece in advance. As other users mentioned, you need to start at about a 45° angle on the perimeter of your planted hole so that you can get a starting point and then, once you’ve cut a groove into the material slowly lower the blade into the face of the tile and continue drilling. Either dip the bit into water periodically or spray water onto the hall. You’ll get a much cleaner, cut and much less dust if you keep it wet. For starting, bring your drill up to a medium speed carefully guide the edge of the bit down to the tile . If you begin at a very low speed, the drillbit will catch and skate across the tile potentially damaging the finish. (Don’t ask me how I know this). The only problem I encountered was that you end up with tile and backer board material filling the inside of the bed and you have to periodically stop to clean this out. A finishing now or possibly some stiff wire, will help to push the little Coors of tile and cement out of the end of the bed, especially if you keep it wet.
M**S
Works perfectly and you get a whole set for the cost of a single bit at the local store!
I just used these to drill several holes in ceramic planting pots for drainage. The pots ranged from large outdoor patio pots (from the Swedish store) to a small window-sill pot. After chucking the bit into the drill securely, I turned each pot over and filled the natural indentation with regular tap water, thus creating a 'pool' of water. Then, I started the drill on high speed and held the bit at an angle so that just the edge was digging into the ceramic to get the hole started. Once I had a divot started, I slowly raised the drill to vertical so that the entire circle of the bit was contacting and cutting. Using only light to moderate pressure, the bits cut through the ceramic in seconds. I did stop the drill and raise the bit out of the cut occasionally to allow fresh water into the crevice to cool and lubricate the bit. These are a fantastic value and I think that if treated properly (e.g. you use water to keep the bits cool and lubricated while cutting) they should last much longer than the tiny pricetag would have you expect. The local home improvement store wanted almost as much for a single bit as this entire set cost. I have no doubt that I'll use these again in the future and will find their value for the dollar only increasing. For those who are having trouble with cutting ceramic pots using these, be sure to use water, have your drill on high speed (there's a gearbox on most drills that selects high or low speed), and just be careful and you shouldn't have any issues.
J**D
Nice bits!
I put a new floor in one of our bathrooms this past week and I decided that I wanted to have the flange on top of the tile. That meant that I would need something that could delicately cut through my nice new tile without causing breakage. I ordered this set (Neiko 00823A 5-Piece Diamond Hole Saw Set) hoping that it would get the job done. And did it? Yes, yes it did and better than I had hoped. I used two of the bits. I used the largest one to also some of the tile around the drain hole since I didn't get it cut quite right. I also drilled 5 holes for the screws with the 1/4 inch bit. Both bits did a fine job and helped make my work look semi-professional. I was quite pleased. There are a couple of things people ought to know though. The first is that anytime you used a diamond studded bit or saw that you need to mitigate the heat as best you can. I poured a little water over the area I planned on drilling in, and then about half way through I gave it a little more. You don't need a lot. I used a syringe, but a glass would have done fine. Keeping it cooler will help prevent the diamonds from detaching. The second thing is that cleaning out the shafts might not bee very easy if you don't do it regularly and by that, I mean every hole. If the dust mixed with the water hardens then it will take more effort to get it clean. Be patient. This isn't going to work as fast as a wood or metal bit and you don't want to put too much pressure on it at any given time (heat is your enemy). If you wonder if these are cutting just look for the dust or pull it up and see. Finally, understand that it takes a moment for these bits to grab and start a hole. The big one wanted to slide around on me, but when I fired it up and got my drill at full speed before touching the tile, that helped. When I tried to cold start it in place it went all over the place. All in all, these were a great purchase and they did they job very well. I have no idea how well they'd stand up to heavy use, but for my little job they were perfect. I'd expect them to do well for many more to come though.
D**N
Good value for the money, but...
For the money, these are okay bits. They drill reasonably quickly (a few minutes per hole depending on hole size and material thickness and hardness), and hold up pretty well as long as you use adequate water and moderate down pressure when drilling. But depending on how you value your time, spending a little more money can actually save you money. These bits are extremely difficult to remove the core from once you've drilled a hole, especially with the smaller size bits and when drilling anything 3/8" or thicker since the side port will be blocked (the port normally lets you insert a small allen wrench and lever the core out). Generally I had to remove the bit after every hole and use a needle punch and hammer to drive the core out. It usually took longer to clear a core from the bit than it took to drill the hole. More expensive offerings from Bosch, DEWALT, et al, have a core ejection port in the side of the barrel. Unless you're on a very tight budget, if you have more than one or two holes to drill I'd suggest looking at bits with a side ejection port.
K**N
Works as a mini hole saw but it takes practice to...
I bought this set to drill holes in marble tiles in our shower. Researching the best drill bit to use for marble diamond coated bits came up as the answer. Because these don't have a sharp point like brad point bits, these mini hole saw bits can wander if you don't start them by positioning the bit at an angle. Angling these bits helps minimize the bit wandering by allowing the edge to "grab" and make a contact point. After a divot is created you can slowly tip the bit up straight and then drill straight down and applying equal pressure. I practiced on a scrap piece of marble first. Practicing drilling a few holes is recommended to get a tight hole that's not larger than what diameter of the bit you're using. The technique takes practice. Once you practice drilling a few holes you'll get the feel of how it feel when the bit grabs your material As it turned out I found out I was able to use a conventional tile bit in marble and wound up using it instead of these Neiko bits. I decided to order these Neiko bits because I had good luck on a previous Neiko digital caliper.
B**R
Worked to Add Drainage Holes to Pottery/Ceramics
One of the best purchases I've made recently! I have a lot of plants, including orchids and bonsai. Recently, a squirrel decided my plant shelves were great for climbing, and knocked a bunch of pots to the ground, smashing them. When I went to buy new pots, I was dismayed to find the available selection in the stores had drastically shrank since the last time I looked. When I did find nice pots of the correct size, they were usually indoor pots with no drainage hole. Most of the plants were ones that must remain outdoors the majority of the year, so drainage was a requirement. Then I visited a store where they offered to put a hole in any pot purchased from them. By that point, I had bought 3 little pots without holes thinking I'd use them as show pots, so I was excited to learn there was a tool that would put a hole in pottery or ceramic without shattering the base. (Which was the result when I've tried with other tools and/or drill bits in the past.) I immediately looked up this type of drill bit and ended up ordering this set. As soon as they arrived, I tried drilling a hole in 2 of the 3 pots. It took some time, but I now have 2 new pots that can be put outdoors! I'm going to paint the now exposed pottery around the hole and seal it with some Thompson water seal. I'm very happy to now have a way to be able to add drainage to any pot.
G**Y
Not worth the money
Not worth the money. Cheapy made and each bit does not have the size which makes them less useful.
M**N
Works, quick and easy.
Needed to drill a ceramic pot. Masonry bits I had wouldn’t do more than scratch through the glaze, even after several minutes. These bits drilled 3 holes in less than a minute. Kept it wet with a spray bottle, no dust and very little pressure needed on the drill. I was skeptical for the price, but I’m impressed with the results.
K**A
Work well
Very practical tool, works well.
S**R
MUY BENAS PARA SACARTE DE UN APURO
Están buenas para perforar vidrio grueso, lo hace muy rápido, como consejo hazlo con el objeto de vidrio a perforar sumergido en agua y adonde vayas a hacer el agujero que quede ligeramente, pero muy ligeramente sumergido. Haciéndolo así en 15 segundos realicé cada perforación, lo que con otras brocas de punta se tardaba hasta 30 minutos cada uno. Lo malo es que se desgastan muy rápido, pero para mi proyecto funcionó muy bien.
J**9
These worked well for me but I have only used them the once so far.
They did the job i wanted to do.
Trustpilot
3 days ago
4 days ago