
![eXtremeRate DIY Replacement Shell Buttons for Nintendo Switch, Light Violet Back Plate for Switch Console, Custom Housing with Full Set Buttons for Joycon Handheld Controller [Only Shell, NO Console]](https://images-na.ssl-images-amazon.com/images/I/516GPz9UrCL.jpg)


🎨 Unleash Your Style with Every Game!
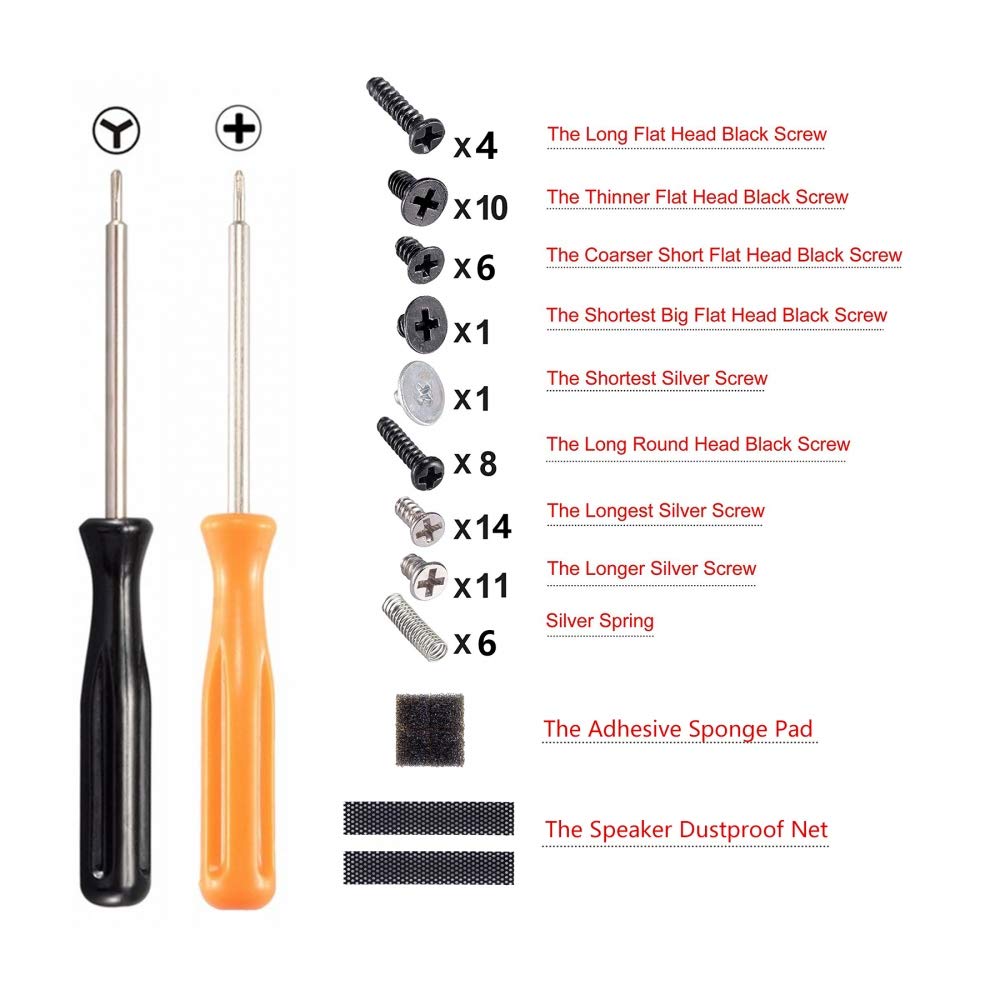
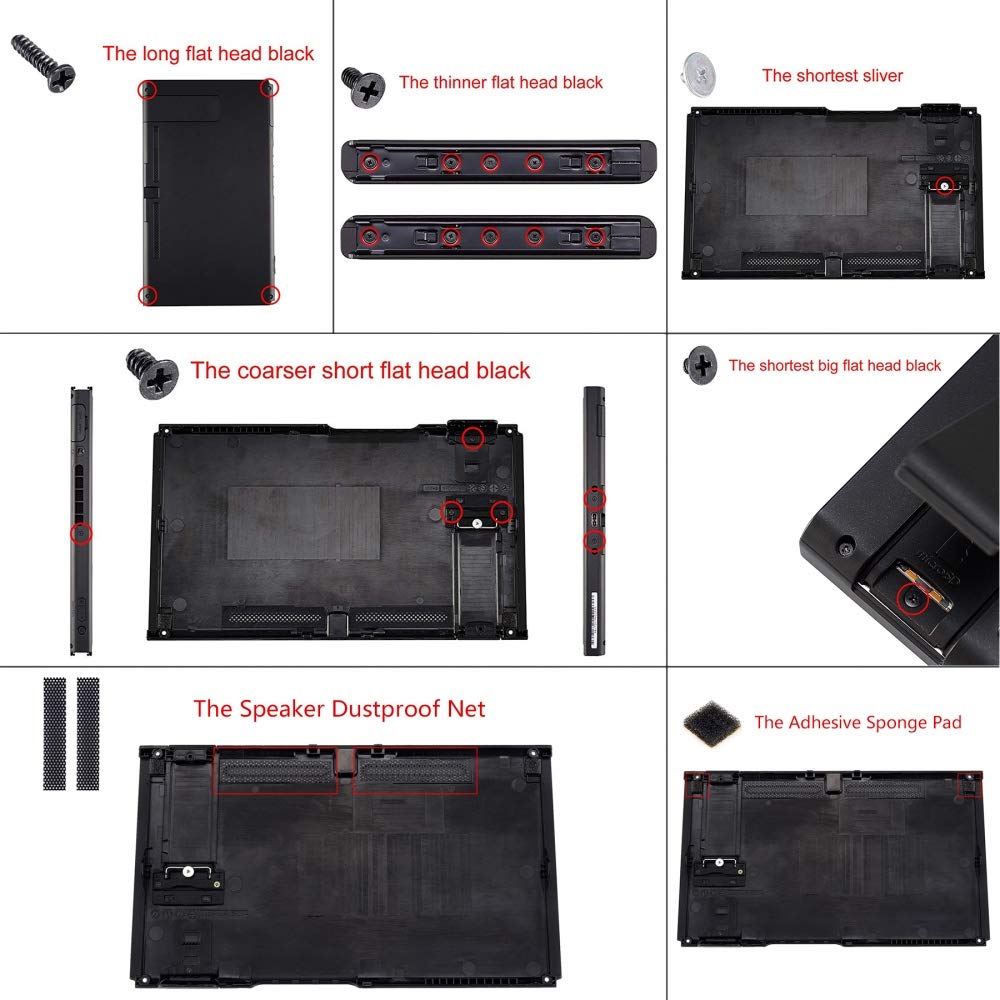
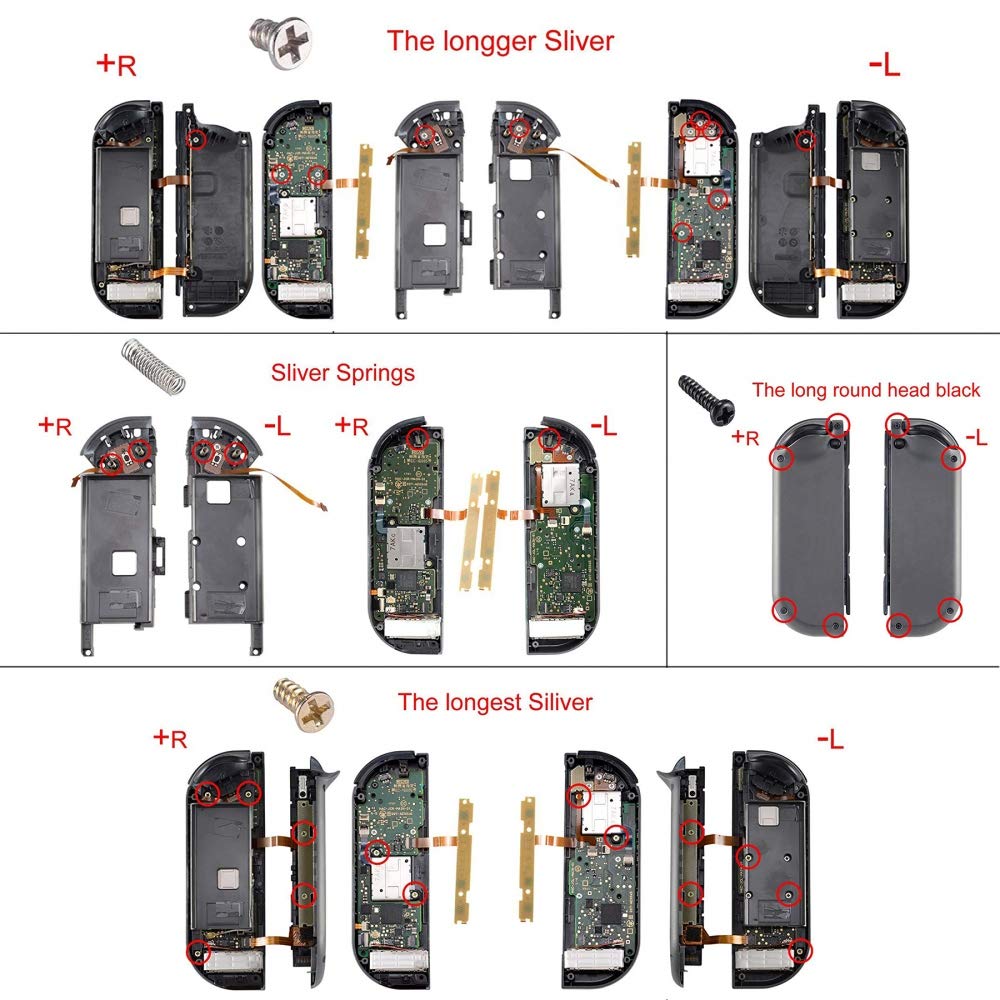
The eXtremeRate DIY Replacement Shell Buttons for Nintendo Switch offers a custom-designed light violet back plate and full set of buttons, allowing gamers to personalize their console. This unique housing is precision cut for a perfect fit and includes tools for installation, making it ideal for DIY enthusiasts. Note that installation may void the warranty.
C**
Take your time and you’ll get beautiful results!
I wanted to create my own custom Sailor Moon themed switch so when I found this pastel pink kit I was so happy(stickers were purchased by me on Etsy). I’m super impressed with the quality and the finished look. I also purchased the white button kit from them. My experience with installation was very good. I had no issues whatsoever. So with that in mind here are a few tips:1. Use your own tools. Yes, the kit comes with the screwdrivers you will need. But they’re not very good. You can get a set of small screwdrivers, as well as the special Nintendo screwdriver right here on amazon. You will need the “switch screwdriver” as well as a ph000 screwdriver. I cannot stress this enough. Using the ones that come with the kit will very easily strip the screws as you’re trying to get them out.1a. While on the topic of screws, pay attention to the screws you’re are removing and make sure you’re using the correct screwdriver. Some are “y” shaped. These will require the special Nintendo screwdriver.2. TAKE YOUR TIME. This is not a quick project. If you’re in a rush to get it done, you will make mistakes and possibly damage something. This requires a patient and delicate hand. DO NOT OVER TIGHTEN THE JOYCON SCREWS as you’re putting it back together. This could not only damage the delicate parts inside but also mess with button function.2a. If you do strip a screw the tiniest bit, but you manage to get it out DO NOT reuse that screw. Replace it with one of the screws from the kit.3. FOLLOW THEIR VIDEO. The video is very detailed and well done. My suggestion here is to change the playback speed of the video to .5x. At original speed it’s a bit too fast to follow. I paused after each step to make sure I was doing it correctly. If possible watch the video before you even begin just to get a feel for the whole process, then begin your installation.4. Pay attention to the screws as you are removing them. There are many different lengths used. I used little paper cups to put the screws in as I removed them step by step. So I had several little cups to keep the screws I removed sorted.5. Some screws might give you a little bit of a fight. BE PATIENT WITH THESE. Nintendo doesn’t want you getting up in there so some of the screws have what looks like a tiny bit of tread glue. So you’ll have to “break the seal”. Again, be patient and careful. The last thing you want is a stripped screw as you’re trying to remove parts. This is where having proper screwdrivers will come into play.5a. This also goes for some of the internal parts of the JOYCON that will need to be removed. For example, the little vibration element is taped down, as well as the battery. It’s not hard to remove them at all. Just be aware that they are taped down.6. Get a good pair of tweezers! This was insanely helpful. Not only in disconnecting the ribbon cables, but also in getting out and putting some of the smaller buttons back in.This last one is about the casing itself. Because of the satin/matte finish the casing could very easily get dirty or scuffed. I opted to purchase a clear protective shell to ensure neither of those things happen. I also knew I’d be adding stickers so I wanted to keep those clean and safe as well. Personally, I like the look of the clear protective shell.**EDIT** MAKE SURE TO READ THE DESCRIPTION ON THEIR INSTALL VIDEO. THEY MADE A SMALL MISTAKE IN THE VIDEO WITH THE ZR BUTTON RIBBON AND THEY CLARIFIED THIS IN THE DESCRIPTION OF THE VIDEO**I think that is about it. I’m very happy with my purchase and the final result.
Z**E
BUYER BEWARE!!!
If you decide to follow their instructions on YouTube on how to replace the shell, DO NOT REMOVE ANY OF THE RIBBON CABLES! the tutorial shows to remove the ribbon cables but you do NOT have to remove them at all. Because of their dinner video I broke my left joycon and I learned from my mistake on my second run and I successfully replaced the shell on my right joycon WITHOUT removing any cables. Other than the stupid video I'm please to say that the shell is amazing and almost flawless. The design doesn't match up witch could also be annoying. Look at pictures posted and see what I'm talking about
A**D
Beautiful and worth the effort.
Excellent shell for my Switch. Color is accurate to description (Sakura Pink) and the soft touch finish feels very nice!I used my own tool set as I found some of the screws a bit difficult to turn with the included ones.Installation was a little time consuming, but easy enough to follow their YouTube video. I also recommend an addition of tweezers if you’re only going to use their included tools, as it’s helpful for inserting the ribbon cables back in within the JoyCons.Overall I’m extremely happy with the color and look of my Switch now.P.S.This would void any remaining warranty you might have on your Nintendo Switch - I’ve had mine longer than a year and it didn’t matter for me.
K**E
Peeling
I was really excited to get this and re-shell my Switch in it. I'd gotten their mint green backplate and it was perfect. High quality, fit perfectly.This recent one wasn't as perfect. On the outside of the backplate, there is area around the kickstand where it looks like the paint (or whatever they used) wasn't applied well, or it was scratched off..? Not sure. Last thing, the part on the right joycon where the rail screws on was loose and my screw won't tighten - it's just loose no matter what. So the rail is loose. Even with it all closed up at the end, it still doesn't feel like it's seated the way out should be. HOWEVER, it's not bad enough for me to take everything apart again and return it. It's a gorgeous shell and they do a good job with 99% of it. Overall, the fit on their shells is still a lot better than another company I've used. I had a lot easier time putting this together. There was fiddling with the seating and having to file anything down. I do wish there was a way to get just the backplate replacement, so that I don't have issues with that area on the back peeling, especially after the shell is no longer available. It's just soooooo freakin' gorgeous.EDIT: It's less than 2 months later and the print is starting to peel and wear through. Meh.
D**S
Great way to personalize your Switch
I really like these shells. They are sturdy, hold up well under heavy use, and really add personality to your Switch. I have included a picture of three Switches, 2 with shells and 1 stock. A word of caution, as others have also stated, this is NOT the easiest of projects. I've replaced iPad screens and taken apart MacBooks and iMacs, and other various electronic gadgets over the years. While this does not rank as high in difficulty as some of those projects, it's certainly up there. There are some very small screws and the proper tools are key to avoid destroying these screws. I used a kit I had lying around from iFixIt. Patience is the key. I'd say it took me 1 1/2 to 2 hours the first try. I used the Brightech LightView PRO - LED Magnifying Glass Desk Lamp, which helped greatly. Highly recommended for experienced techies. I've also included two Pro Controllers with after market shells for color reference. You'll the light grey controller pairs up nicely with the SNES shell.
N**N
The most powerful plastic known to man
I bought this as a base to paint for my girlfriends switch as she wanted cute colours for her controllers and backplate. Basically I had to sell my soul, do several complicated rituals and spells, sacrifice the soul of a baby goat and pilgrimage to the top of a mountain to be blessed by a monk before I could get the paint to take. The material would self heal, and reject the paint. So any sanding, any paint type- the blood of the lord himself was rejected by the plastic. So if you’re worried that the “white will get dirty over time”, don’t. This plastic alone has the power of the awakened master sword- it just keeps coming back.Comes with all the screws and a screwdriver too, cute packaging so I can gift wrap it. 👌🏻👌🏻👌🏻👌🏻
A**D
Excellent switch shell
Very nice product, looks impressive as purple when you look at it in one direction and blue when in another. Surface is glossy but it doesn't attract fingerprints from what I notice, but could lose grip if you get sweaty like me :). Reason right joycon has black buttons is I forgot to put purple buttons in and didn't want to take right joycon apart as the right joycon is a lot more fiddly than the left - I ended up accidentally ripping the ribon cable on the vibration part, so had to use a different joycon, luckily the joycon I broke had been donated to me by a friend as the thumbstick drifted.I don't have any experience really in doing electronics or anything and I managed to do it, so I say have a go. But only if you don't mind possibly risking a joycon. The back plate is easy - but make sure to use the extra screws provided as I found that the phillips screws were a lot easier to take out again without accidentally stripping them (which i ended up doing to a screw near the sd card and having to use pliers to get it out).
M**Y
The shell is good quality but do not use the supplied tools under any circumstance
I read ahead of receiving the shell about how bad the tools were but didn't think they would be that bad. Do not ignore the warnings.I attempted the backplate first with the supplied phillips and the screw on the side instantly stripped off; then spent about half an hour trying to get this screw out using the old techniques (Rubber band trick and using superglue). But the screw head is just too fine to recover and it's pretty much never coming out unless it's drilled. So the backplate is pretty much on there for good now.After this I got my hands on some proper precision tools: A 1.5mm phillips and a 1.5mm tri wing screwdriver. I then did the joy cons following the instructions on the video and had no problems at all. So now I have a default (And now permanent) backplate and modified joy cons now which luckily still look good since they fit the theme of yellow and black still and am happy with the result.It's a neat idea to have all the items you need come in one package but the execution is really bad and could cause someone to do irreversible damage to their console like I have.
S**W
Thay may look nice but...
It may look awesome in the photo but the tools that come with it areCrap and would not turn the screws infact it almost striped one nowI can’t put it on my switch it’s still in its box not sure what to do with itWaste of money maybe with a pro screwdriver u would have better results
M**
Jolie coque mais attention aux tournevis
J'ai voulu tenter le mélange Rouge/Or , je suis très satisfait du résultat ! La coque de la switch est assez facile à monter, en revanche les Joycons c'est assez compliqué, il faut être assez précis mais en suivant un tuto on y arrive lentement mais surement. Attention aux tournevis qui peuvent abîmer les vis, j'ai acheté le matériel à part personnellement même si deux tournevis son fournis. La qualité est peut-être moins durable que ceux d'origine mais jouant quasiment tout le temps avec la manette ce n'est pas un problème pour moi. Je voulais surtout changer le style de ma console :)J'espère que ce post vous aidera, j'ai voulu apporter mes photos pour aider ceux qui se renseigne à se faire un meilleur avis sur le rendu final !
Trustpilot
1 month ago
1 month ago